


INTRODUCTION
CI/CD workflows play a very integral role in an agile SDLC (Software Development Lifecycle), fostering efficient delivery of robust software by automating building, testing, packaging, and deployment of code using repeatable and reliable processes. In this article, we will integrate a CI/CD workflow into an existing FastAPI application using GitHub actions and Heroku for deployment.
WHO IS THIS ARTICLE FOR?
- Beginners, and Python developers interested in integrating CI/CD into their software development workflow using GitHub actions.
PRE-REQUISITES
- Python 3.6+ and Pip installed on your machine
- Basic knowledge of FastAPI, Check out the FastAPI Official Documentation
- A GitHub and Heroku account
- Heroku CLI
LEARNING OBJECTIVES
- To understand fundamental concepts in CI/CD
- To develop a CI/CD pipeline for automating testing, linting, and deployment of a FastAPI app using Github actions and Heroku for deployment.
BRIEF OVERVIEW OF CI/CD
CI/CD Terminologies
CI/CD combines three essential processes in a modern software development lifecycle. CI stands for Continuous Integration, and CD stands for Continuous Delivery or Continuous Deployment.
- Continuous Integration (CI):- CI involves a series of steps for automatically building and testing changes in code before merging into a centralized repository. This enforces the quality of the code before pushing it into production. Code linting can also be included in CI pipelines to analyze code for bugs and style compliance.
- Continuous Delivery/Continuous Deployment (CD): - After the CI process, the entire code changes are merged in a centralized repository based on the version control system, and built to generate deployable packages or
artifacts.
A typical Continuous Delivery pipeline ensures that these artifacts are readily deployable for different environments i.e. staging, QA, etc. However, these deployments are manually triggered by the developer in this case.
Continuous Deployment involves automatically deploying the code to a production environment i.e. on a Kubernetes cluster, AWS, Azure, GCP, or Heroku without human intervention using a consistent process.
The primary benefit of CI/CD is to accelerate the release of quality software using consistent processes and deliver business value faster.
To read more on CI/CD and its benefits, check out this Atlassian article
CI/CD Tooling
This section provides an overview of tooling used in modern CI/CD workflows. There are a number of open-source and paid services which help to streamline and automate CI/CD processes for a vast number of programming languages. Some of the most popular CI/CD tools include Travis CI, CircleCI, Jenkins, GitLab, Azure DevOps, AWS DevOps tools, GitHub Actions etc. Check out this blog post on CI/CD tools and their performance comparison.
GETTING STARTED
In this hands-on section, we shall apply most of the CI/CD concepts outlined above into a FastAPI application on Github.
FastAPI is a modern, high-performance (fast) web framework for building APIs with Python 3.6+ based on standard Python type hints.
The FastAPI app is a simple REST API where users can manage a Bucket List using typical CRUD operations. The API also supports JWT-based user authentication with an SQLite database for persistence via SQLAlchemy's ORM. The entire structure and description of the API, routes, and unit tests can be found in the README.md file on the GitHub Repo.
With this basic overview, I think we are ready to Get started. Let's GOOO 🚀🚀
Development Setup
To setup this basic FastAPI app: -
- Clone the GitHub repository and switch to the starter branch
$ git clone https://github.com/rexsimiloluwah/fastapi-github-actions-test.git $ git switch starter - Create a Python Virtual Environment and Install Required Dependencies (using venv)
$ python -m venv env
$ source activate env/Scripts/activate
Run the Application
$ cd src && python main.pyThe application starts running on port 5000, You can view the swagger-generated docs at
http://localhost:5000/docsfor reference.The Unit tests for the API are available in the
testsfolder. The unit tests leverage the Starlette-based FastAPI TestClient, the local SQLAlchemy DB session was created using dependency overriding via a pytest fixture for a modular testing experience. This essentially uses a separate SQLite database for testing purposes.
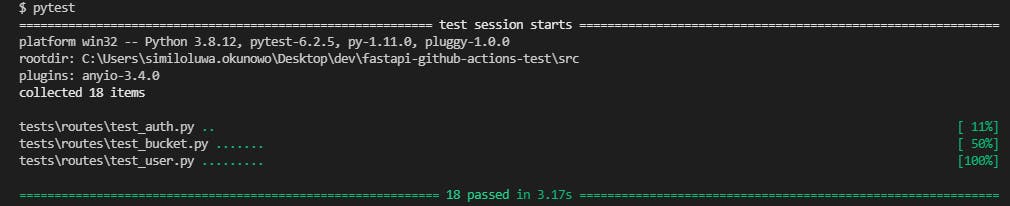
To run the tests using pytest: -
$ pytest
All the unit tests are successful as illustrated below: -
INTRODUCTION TO GITHUB ACTIONS
GitHub Actions provides a way to easily automate and customize CI/CD workflows for your software development lifecycle, all in your GitHub repository. GitHub Actions provides a completely free plan for open-source projects and has an active ecosystem with pre-designed and reusable workflow templates available on the GitHub Actions Marketplace.
To use GitHub Actions, you need to create a workflow file in a .github/workflows directory of your repository. A workflow basically defines an automated process for the CI/CD pipeline containing one or more jobs that are triggered by an event. The event could be a GitHub activity (i.e. push or pull request) or a scheduled event. The workflows are defined in a YAML syntax.
A JOB contains steps - a series of tasks (commands and actions) that are executed sequentially in a virtual machine instance. These actions could include setting up a Python environment, installing dependencies, building a Docker container, publishing a package to an NPM registry, deploying to Heroku, etc.
A typical Github actions workflow syntax can be found HERE
IMPLEMENTING THE CI/CD PIPELINE
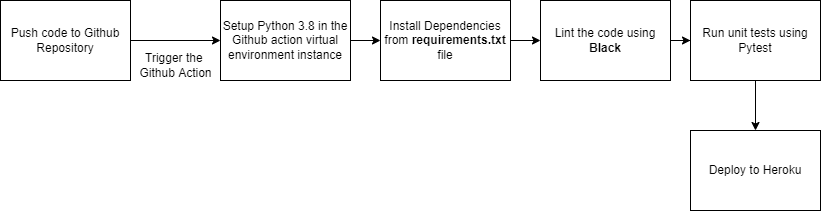
Go to the Actions tab of your GitHub repository, some workflow templates are available for use. However, we shall create ours from scratch. I have illustrated the sequence of steps to be executed by our GitHub Actions CI/CD pipeline for setting up Python, installing dependencies, testing, linting, and deploying to Heroku. When a single action fails, all concurrent actions stop, and the workflow execution is exited.
STEPS
1.Setting up the Workflow
Create a main.yml file in the .github/workflows directory. Paste the following in the main.yml file. This basically defines the triggers for our GitHub Action using the on command, and the jobs. The job runs on the ubuntu-latest VM, which is an Ubuntu version 20.04 GitHub-hosted runner. The steps defined in the job below basically set up Python 3.8 and install the required dependencies.
#main.yml
#This workflow will install Python dependencies, lint using Black, run tests using Pytest
#and Deploy the FastAPI app to Heroku
name: fastapi-github-actions-test

on:
  #Trigger the workflow on a push event to the master branch only
  push:
    branches: [master]

#A workflow job running sequentially
jobs:
  build:
    #runs-on: defines The workflow runner
    runs-on: ubuntu-latest
    #steps: defines a series of tasks executed by the Job
    steps:
    - uses: actions/checkout@v2
    - run: |   # To fetch all history for all tags and branches
        git fetch --prune --unshallow

    #Task for setting up Python 3.8 using actions/setup-python@v2 Github action
    - name: Set up Python 3.8
      uses: actions/setup-python@v2
      with:
        python-version: 3.8 # Modify python version HERE

    #Task for installing dependencies, multi-line command
    - name: Install dependencies
      run: |
        python -m pip install --upgrade pip
        python -m pip install black pytest
        if [ -f requirements.txt ]; then pip install -r requirements.txt; fi
2.Linting
Linting is another important phase in a modern CI/CD pipeline to check for bugs, format code, and enforce code style compliance. This workflow uses black, my favorite Python code formatter. You can check out the documentation HERE. Recall that black package was installed in the dependencies installation task. To include the linting with black step:
#Add this under the steps
steps:
#....
#Task for linting with black
- name: Lint with black
  run: |
    # Code formatting with black, check every python file in the src directory
    black src
    black --check src
Check this awesome Article on how to use black in git pre-commit hooks.
3.Testing using Pytest
Here, we will create another command to run the unit tests using pytest. The environment variables have been added using GitHub secrets. GitHub Actions secrets provide a secure vault for storing confidential credentials and encrypted variables.
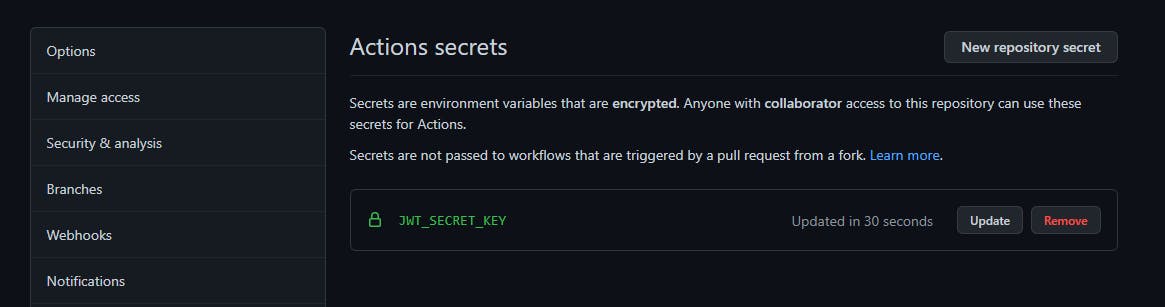
To create the secret for the JWT_SECRET_KEY: -
Go to Your repository -> Settings -> Secrets tab -> New Repository Secret
Add the name of the secret (JWT_SECRET_KEY) and the corresponding value (<your-super-secret-jwt>).
Add the following under the steps:
#Task for testing with pytest
steps:
#......
# Task for testing with pytest
- name: Test with pytest
  env:
    # Uses the JWT_SECRET_KEY env variable from the Github actions secrets
    JWT_SECRET_KEY : ${{ secrets.JWT_SECRET_KEY }}
  run: |
    pytest
4.Deploying to Heroku
To integrate the Heroku deployment workflow, we need to create a new app on Heroku and an Authorization token. The Heroku CLI will be used to perform all commands, the Heroku CLI can be downloaded HERE for any OS.
To create the new app using the CLI: -
$ heroku create
This should generate a URL with a random app name i.e.

To create the Heroku authorization token: -
$ heroku authorizations:create
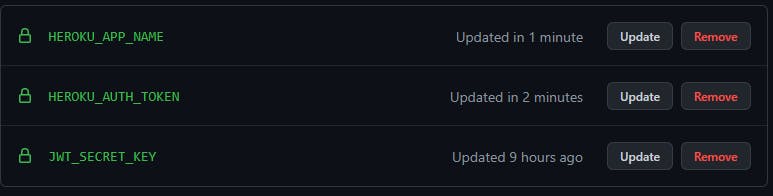
This should create an OAuth token for your Heroku account. Set the following secrets in the GitHub actions secrets of your repository, These secrets will be injected as environment variables in the GitHub Actions workflow for deployment to Heroku: -
HEROKU_APP_NAME- Name of the generated appHEROKU_AUTH_TOKEN- The generated token in the last step
To add the workflow for the Heroku deployment: -
# Task for deploying to Heroku
- name: Deploy to Heroku
  env:
    HEROKU_AUTH_TOKEN: ${{ secrets.HEROKU_AUTH_TOKEN }}
    HEROKU_APP_NAME: ${{ secrets.HEROKU_APP_NAME }}
  if: github.ref == 'refs/heads/master' && job.status == 'success'
  run: |
    git remote add heroku https://heroku:$HEROKU_AUTH_TOKEN@git.heroku.com/$HEROKU_APP_NAME.git
    git push heroku HEAD:master -f
Create a Procfile in the root directory, paste the following command in the Procfile which is executed on startup of the app in Heroku: -
To Create a Procfile:-
web: gunicorn --chdir src -w 1 -k uvicorn.workers.UvicornWorker main:app
Don't forget to add the new dependencies to the requirements.txt file
#requirements.txt
gunicorn
uvloop
httptools
Add environment variables to Heroku
We need to add the environment variables from the .env file to Heroku, we can do this using the Heroku CLI: -
$ heroku config:set JWT_SECRET_KEY=<your-super-secret-jwt>
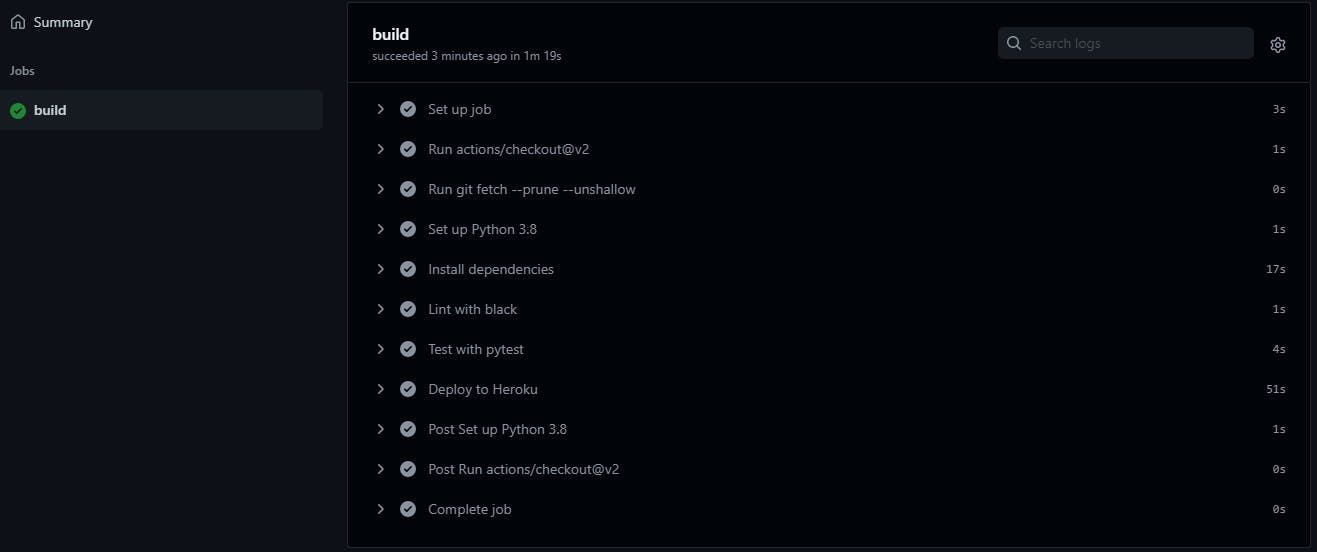
5.Testing the GitHub Actions workflow
- Push the code to your GitHub repository on the
masterbranch - Go to the
Actionstab of your Github repository - The workflow triggered by the push event should be running, the image below shows each stage completed successfully:-
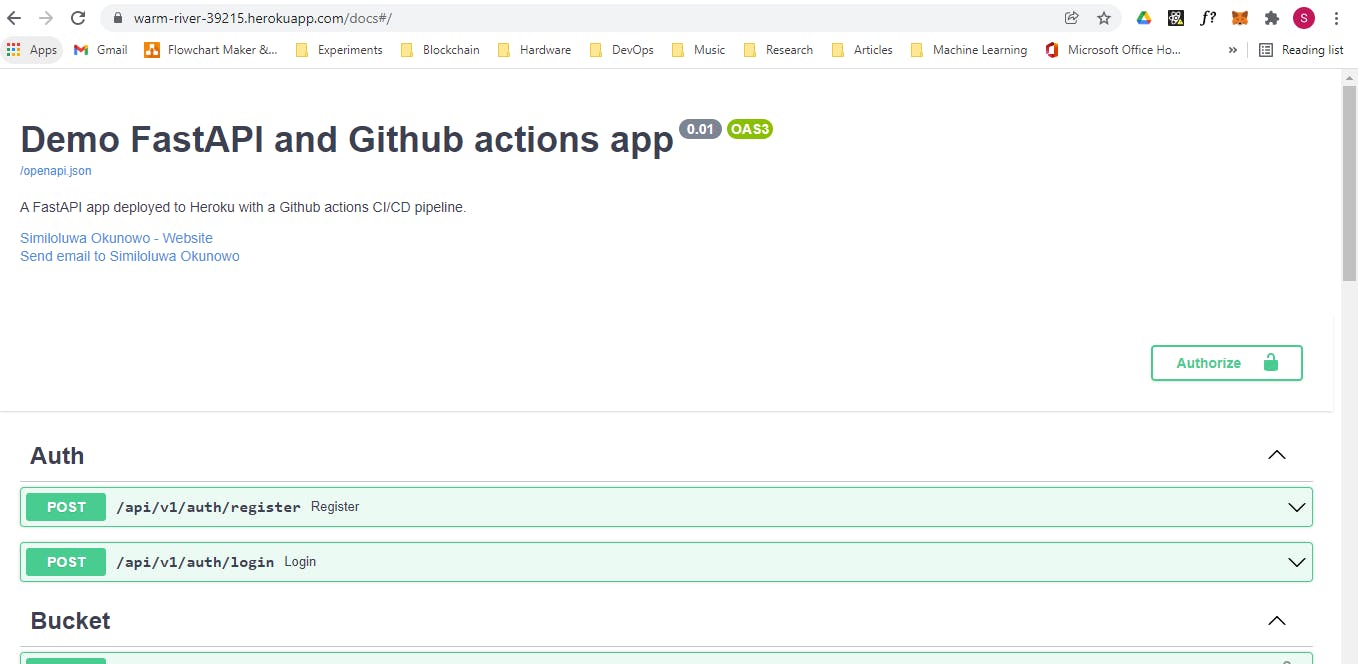
Awesome, you can check the Heroku logs to verify the deployment in your CLI or browser.
To check the Heroku logs for the deployed app: -
$ heroku logs --tail --app <APP_NAME>
Go to the URL of the app to test the deployment, the image below shows the swagger docs deployed on Heroku.
CONCLUSION
Congratulations for coming this far friend 🎉🎉, I hope you gained substantial knowledge on CI/CD and GitHub actions generally. The entire code for this article is available on GitHub
Thank you for Reading!